
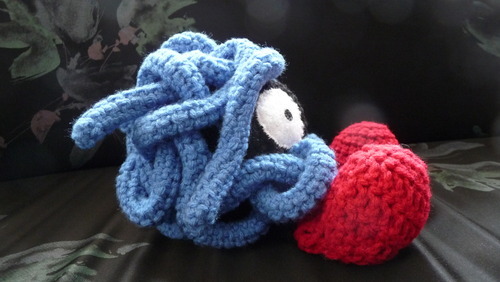
Every month I’d like to feature some of my favourite old plush toys that I’ve made over the years. This month, I am featuring my own version of the Tangela amigurumi!
I made this guy back in my university years, when storing different colours of yarn was easier than storing fabric; my favourite parts to make were the tangles, and then having to figure out where to place them on the head.
This pattern was written a while back to see if I could write it in a more standard format. As long as it is not redistributed for profit, I welcome you to try it out!
Tangela Pattern
Crochet hook: G/6 or 4.25 mm
Yarn: 4 or worsted category, in blue, red, and black
Body
Ch 6, join end ch with a sc to form a ring
Rnd 1: inc in each sc in the Rnd
Rnd 2: [inc 1, sc 1] Rep 6
Rnd3: [inc 1, sc 2] Rep 6
Rnd 4: [inc 1, sc 3] Rep 6
Rnd 5: [inc 1, sc 4] Rep 6
Rnd 6: [inc 1, sc 5] Rep 6
Rnd 7: [inc 1, sc 6] Rep 6
Rnd 8: [inc 1, sc 7] Rep 6
Rnd 9: sc in each sc in the Rnd
Rnd 10: [dec 1, sc 7] Rep 6
Rnd 11: [dec 1, sc 6] Rep 6
Rnd 12: [dec 1, sc 5] Rep 6
Rnd 13: [dec 1, sc 4] Rep 6
Rnd 14: [dec 1, sc 3] Rep 6
Rnd 15: [dec 1, sc 2] Rep 6
Rnd 16: [dec 1, sc 1] Rep 6
Rnd 17: dec 6 times consecutively; break yarn and slip through last sc
Note: begin stuffing the body when starting the decreasing rounds
Legs (make 2)
Ch 10, join end ch with a sc to form a ring
Rnds 1- 4: sc in each sc in the Rnd
Rnd 5: sc in each sc in the Rnd; break yarn and slip through last sc
Feet (make 2)
Ch 6, join end ch with a sc to form a ring
Rnd 1: inc in each sc in the Rnd
Rnd 2: [inc 1, sc 1] Rep 6
Rnd 3: [inc 1, sc 2] Rep 6
Rnds 4-5: dc 12, sc 12
Rnd 6: [dc in second sc, dc 2] Rep 3, [dec 1, sc 2] Rep 3
Rnd 7: dc 9, sc 9 on the outer side of the previous Rnd (almost like making a fold)
Rnd 8: [dc in second sc, dc 1] Rep 3, [dec 1, sc 1] Rep 3
Rnd 9: dc 6, sc 6; break yarn and slip through last sc
Vines (make 17 or more)
Ch 3, join end ch with a sc to form a ring
Rnd 1: inc in each sc in the Rnd
Rnds 2- 30: sc in each sc in the Rnd
Rnd 31: sc in each sc in the Rnd; break yarn and slip through last sc
Note: these pieces do not need to be stuffed
Assembling order of the pieces:
1. Attach legs to feet
2. Attach legs and feet to the body
3. Attach two felt circles (about 4 cm in diameter) to the front of the face- it can be hot glued on, or sewn on. Black fabric paint was used for the pupils.
4. Attach the vines onto the body. It can be by:
– attaching all of them first on one end, and arrange the vines to look tangled
-attaching a few at a time, arranging the vines in segments and placing new vines where they are needed
Stitch the vines into place, once they are arranged.
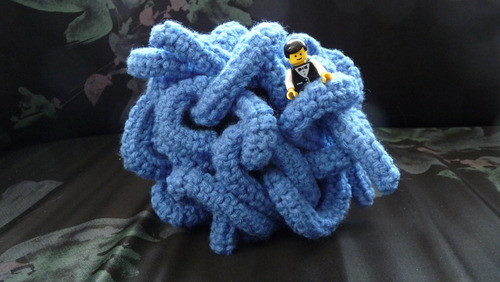
Here’s the back, for reference:
Bonus Pic: I made a shiny version as well!

